Build We Must!

We started building at the end of 2000. My sister decided that we should revisit our childhood dollhouses and "upgrade" them.

Then we started to read dollhouse magazines and realized the large world of dollhouses. We sent for catalogs, went to shows, and found local shops. We were amazed and delighted. We decided to build 1:12 scale houses. My sister bought a dollhouse at Target, we put it together, decided it was too small, bought another and bashed the two! We called the house The Original Rowbottom Manse. With this success, I designed, and we built a "mansion" -- Sunnybrook Farm (see original blog for both).

All our houses have families living in them and a story is built around their personalities and lifestyles. This story is an integral part of the building process, and is included in the blog.

Showing posts with label slates. Show all posts

Saturday, February 27, 2016

Home At Last--well, almost

Home at last! Well, sort of ...

Every time I think I just have a few more "finishing touches" that shouldn't take too long, fate proves me wrong. The smallest thing grows like Jack's beanstalk. The thing that should have been so easy to do, becomes a challenge. Grumble, grumble, grumble.
...
Anyway, I love making Larkspur Lane, but I am getting "tired" of doing it. My "wanderlust" is calling me to work on a different house. I am trying not to stray, though, but it is getting harder. I keep looking at the Montclaire, and thinking that I should maybe work on attaching the front doors (yet to be cut!) and the porch (yet to be designed!). Speaking of porches, I have decided not to add a front porch.
...
I have a permanent table for Larkspur, and it is now on it with some arbitrary landscape just to make it look like home! I decided it was finished enough and I just had to give it a "life" of its own.
...
In my next post I will describe the trials and good results of using the paper/light poster board [?] brick sheets from HBS. I will tell you, once you figure it out, it's lovely, but ...

Paper brick sheet from HBS.
...
Progress:
The sloping roof is slated, but the dormer roofs need a little more work. The roof is hinged to the flat roof--that actually went quickly! Unfortunately, this thin wood that I used after deciding many times that I would never use it again, has warped at the on the bottom right. Thus I will add a discrete hook and eye to hold it flat.
...
The "take-away" front holds nicely, but I think just to ensure that hold, I will add a small magnet between the exterior and the interior.
...
The flat roof, which actually has a slight slope, is waiting to be finished. I have some electrical wires coming through the roof so I am considering making a roof, over the permanent roof, that can be removed if I have to get to those wires. All the other wires come out the back, so no problem there. All the wires will go into a power strip into a transformer. All the lights planned are in, but I may add 1 or 2 more later. The one thing to be done is how to attach the electric lights to the pull-away front of the house. I am thinking of using a connector to a 9-volt battery hidden in the landscape so I can easily unhook them when I want to open up the house.
...
A number of finishing touches need to be done, but at least now, the Spencer family has a nice, "weatherproof" house in which to live.
...
Some pictures:
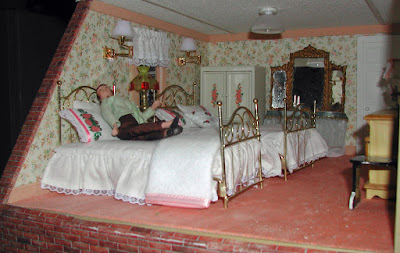
Robin's bedroom -those wall lamps were a horror to get on the walls!
Tiny screws, unusable, top-heavy light, but lovely. From HBS.
Ignore the dust, and the ceiling light that refuses to stay glued. I replaced the mahogany vanity with an equally lovely style from HBS.

...
Montclaire House:
It has looked this way for almost 2 years -- and it is such a beautiful house!

OK, now it's your turn! I have cut the front doors and marked the openings for the windows and front door (yet to finish designing the roof with dormers and the front porch). I do have a quandary--I want the house to be "yellowish" sandstone bricks. I was going to going to "do it myself" by covering the wood (3/8" Birch plywood, RGT Montclair kit bash) with a sanded, tinted grout, and then when dry, score it into bricks. I have used this method before--it's boring, tedious, nerve-wracking, and time consuming, but does look good--if you live through the experience!
...
But I have found the vinyl brick sheets (MBS) my sister bought to cover the house. I did a test and they can be refinished. So now the thought of being able, after letting this beautiful house sit neglected for 2 years, be given a exterior finish in a shorter amount of time, is appealing. I will add a picture in my next post.

Sunday, December 13, 2015

The Excitement Begins

It took a long time to find a name for this house. Then I remembered a favorite book from my  childhood—The Password to Larkspur Lane! (Nancy Drew was my favorite series.) I don't remember the story, but I always loved that street name!
The house is owned by Abigail and Samuel Spencer and is “located” in Williamsburg, Virginia just outside the Historic District and not far from Abigail’s Teashop (Iris March Creations blog). For previous dollhouses, I always wrote a detailed biography of the owners. There is a partial bio of the Spencers in Iris March Creations. While I am back in the dollhouse hobby, I have not as yet, got back into that level of detail--maybe later, or for the next dollhouse.
 ....
This dollhouse will be a simple bash. I am basically following the original except making it a front-opening Colonial.
"Simple Bash" --famous last words
Just 4 rooms -- dining room, living room, and 2 bedrooms  -- just tired of kitchens and baths (except in real houses!)
Picture windows in living room and dining room
I recut the wood from ¼” plywood to make a more stable dollhouse without “patches” and with a more stable wood. The exterior dimensions are 28 3/8 x 16 ¼ x 28” tall. The living room is 13” x 16”, the dining room 12” x 16”, and the bedrooms have similar sizes. The 1st floor has 9” ceilings, the 2nd floor 7 ½“, but sloping. There will be a center chimney.
--------------------------
A word about the lumber:
I used to get good Luan mahogany 1/4" (actually 3/16") and another type (can't remember the name) at Home Depot. No such good stuff this time around, and actually, expensive for poor quality. I did not realize the lack of quality until I started to use it. I have enough usable pieces, and it will work out, but I will never buy it again. 
----------------------
The house will be brick using HBS brick sheets and the sloping roof will be slates which I will make using the method I developed for 2004 Oddjob Lane (Iris March Creations blog).
The "slates" on OddJob Lane

The fronts will be “pull-away” as opposed  to hinged since this is only ¼” plywood. Of course, I am not sure how “pull-away” works with thin plywood either!
The 1st floor flooring is my old favorite for these small houses: ConTact glued to poster board, cut into strips, and glued to the wood with Aileene’s. I think the bedrooms will be carpeted, I like laying individual strips—but only up to a point!
ConTact "wood plank flooring"
The living room will have a “real” single French door, while the dining room will have a faux door to the “kitchen” and the bedrooms will have faux doors to “bathrooms”. I will make the faux doors.
Because of the quality of the wood, the inside walls are first covered with white poster board and then wallpapered.
That's all for now. As usual, all takes longer than expected!